LaMa-Inpainting 실습하기
이번 학기부터 졸업 프로젝트를 진행하고 있는데, 우리 팀은 AI 기반 가상착용이 가능한 안드로이드 앱을 만들고 있다. 나는 이번 졸업 프로젝트에서 AI 모델 개발을 맡고 있다.

프로젝트 및 앱 이름은 SeeFit 이다. SeeFit 은 쓰고 있는 안경을 벗지 않고도 다른 안경을 가상 착용할 수 있는 아이웨어 쇼핑 플랫폼이다.
이 프로젝트에서 내가 구현해야 하는 부분은 기존의 안경을 지워주는 일이다. 내가 생각한 구현 방법은 다음 두 가지이다.
- Video Object Segmentation + 픽셀 값 보정
- Video Object Segmentation + Video Inpainting
첫 번째는 Video Object Segmentation을 이용하는 방법이다. 우리는 영상에서 누락된 부분을 정교하게 복원시켜 주는 것보다는 빠르게 구현하는 것이 훨씬 중요하기 때문에 Video Object Segmentation으로 mask를 생성하고, 그 부분을 주변 픽셀들 값과 비슷하게 채워주는 방식이 적절하지 않을까 싶다. (주변 픽셀들 값을 이용해서 채워주는 건 어떻게 구현해야 할지 알아봐야겠다)
두 번째는 Video Inpainting을 이용하는 방법이다. 현재 비디오 인페인팅 소타 모델들을 보면 영상의 시공간적 context를 이해하고 지워서 복원시켜주는 수준 정도로 성능이 좋다. 우리는 Video Segmentation을 이용해서 안경테를 인식하여 해당 부분 mask를 생성하고, mask 부분을 주변 색(아마도 피부색)과 비슷하게 복원시켜주면 된다.
각각의 요소 기술들에 대해 공부하고, 여러 모델들을 조사해보면서 기술을 검증하여 더 적절한 방법을 찾을 것이다.
이번 포스트에서는 Video Inpainting과 원리가 비슷한 Image Inpainting에 대해 알아보고 2022 SOTA 모델인 LaMa-Inpainting을 실습해볼 것이다.
1. Instance Segmentation + Image Inpainting
Video Inpainting을 알아보기 전에 먼저 Image Inpainting에 대해 알아보도록 하겠다. 비디오를 프레임의 연속으로 보기 때문에 비디오 인페인팅의 원리는 이미지 인페인팅과 다르지 않다. 비디오의 각 프레임에 개별적으로 이미지 인페인팅을 적용시킨 것이 비디오 인페인팅이다. 영상 이미지가 아닌 그냥 이미지에 대해서 안경테를 지우는 건 Semantic Segmentation과 Image Inpainting으로 구현하는 방법을 생각했다.
👁🗨Semantic Segmentation이란?
Semantic Segmentation을 한번에 이해시켜주는 그림을 가져왔다.
Semantic Segmentation이란 이미지를 픽셀별로(pixel-wise) 클래스를 분류하는 것이다. 우리는 이 태스크를 이미지에서 안경테에 해당하는 픽셀만 추출하는 데 사용할 것이다.
👁🗨Image Inpainting이란?
이미지 인페인팅은 이미지에서 누락된 영역을 복원 및 재구성하는 컴퓨터비전 태스크다. 특정 객체를 제거하거나 손상된 이미지를 복구하는데 사용된다. 우리는 안경테만 지워주는 기능을 구현해야 하므로 안경테만 인식해서 해당 부분의 마스크를 생성해서 안경테 부분을 의도적으로 누락시킨 다음 이미지 인페인팅으로 안경을 지운 이미지를 생성하는 모델을 만들 것이다.
👁🗨Facial Inpainting이란?
이미지 인페인팅에서 파생된 페이셜 인페인팅 기술도 있다. 페이셜 인페인팅은 얼굴 이미지에서 누락된 픽셀에 대해 그럴듯한 얼굴 이미지를 생성해내는 태스크다.
2. LaMa-Inpainting 실습
이 깃헙 레포에서 퍼포먼스가 좋은 모델들을 확인할 수 있다. 나는 2022 SOTA 모델인 LaMa-Inpainting을 실습해볼 것이다.
1) 드라이브 마운트
구글 코랩에서 실습을 진행하려고 한다. 내 드라이브와 연동하기 위해 드라이브 마운트를 해준다.
from google.colab import drive
drive.mount('/content/drive')
2) git clone
git clone 명령어를 이용해서 오리지널 깃헙 레포를 드라이브에 복제한다.
#@title Run this sell to set everything up
print('\\n> Cloning the repo')
!git clone <https://github.com/saic-mdal/lama.git>
3) requirements.txt 설치하기
실습을 진행하기 위해 필요한 패키지들을 설치한다.
!pip install -r lama/requirements.txt --quiet
!pip install torch==1.8.0 torchvision==0.9.0 torchaudio==0.8.0 torchtext==0.9
!pip install wget --quiet
!pip install torch==1.8.0+cu111 torchvision==0.9.0+cu111 torchaudio==0.8.0 -f <https://download.pytorch.org/whl/torch_stable.html> --quiet
!pip uninstall opencv-python-headless -y --quiet
!pip install opencv-python-headless==4.1.2.30 --quiet
보통 이 부분에서 dependency 에러가 발생하는데, 차분하게 에러 메시지를 읽으면 된다.
예를 들어 아래와 같이 에러가 발생할 수 있다.
ERROR: pip's dependency resolver does not currently take into account all the packages that are installed. This behaviour is the source of the following dependency conflicts. yellowbrick 1.5 requires scikit-learn>=1.0.0, but you have scikit-learn 0.24.2 which is incompatible.
에러 메시지를 읽어보면 dependency 버전이 충돌해서 발생한 에러임을 확인할 수 있다. 친절하게 마지막 문장에는 어떻게 해야 하는지도 알려준다. 기존에 있던 scikit-learn은 제거해주고 버전에 맞게 다시 설치해주면 된다.
!pip uninstall scikit-learn
!pip install scikit-learn==1.0.0
그리고 필요한 패키지들이 버전도 맞춰서 잘 설치되었는지 확인하려면 freeze 명령어를 이용해서 확인할 수 있다.
!pip freeze
4) 실습 화면 HTML 만들기
직접 브러쉬로 이미지에서 복원시킬 부분을 그릴 것이다. 이 실습을 진행하고 결과 이미지를 확인할 화면의 HTML 코드를 다음과 같이 작성해준다.
import base64, os
from IPython.display import HTML, Image
from google.colab.output import eval_js
from base64 import b64decode
import matplotlib.pyplot as plt
import numpy as np
import wget
from shutil import copyfile
import shutil

canvas_html = """
<style>
.button {
  background-color: #4CAF50;
  border: none;
  color: white;
  padding: 15px 32px;
  text-align: center;
  text-decoration: none;
  display: inline-block;
  font-size: 16px;
  margin: 4px 2px;
  cursor: pointer;
}
</style>
<canvas1 width=%d height=%d>
</canvas1>
<canvas width=%d height=%d>
</canvas>

<button class="button">Finish</button>
<script>
var canvas = document.querySelector('canvas')
var ctx = canvas.getContext('2d')

var canvas1 = document.querySelector('canvas1')
var ctx1 = canvas.getContext('2d')

ctx.strokeStyle = 'red';

var img = new Image();
img.src = "data:image/%s;charset=utf-8;base64,%s";
console.log(img)
img.onload = function() {
  ctx1.drawImage(img, 0, 0);
};
img.crossOrigin = 'Anonymous';

ctx.clearRect(0, 0, canvas.width, canvas.height);

ctx.lineWidth = %d
var button = document.querySelector('button')
var mouse = {x: 0, y: 0}

canvas.addEventListener('mousemove', function(e) {
  mouse.x = e.pageX - this.offsetLeft
  mouse.y = e.pageY - this.offsetTop
})
canvas.onmousedown = ()=>{
  ctx.beginPath()
  ctx.moveTo(mouse.x, mouse.y)
  canvas.addEventListener('mousemove', onPaint)
}
canvas.onmouseup = ()=>{
  canvas.removeEventListener('mousemove', onPaint)
}
var onPaint = ()=>{
  ctx.lineTo(mouse.x, mouse.y)
  ctx.stroke()
}

var data = new Promise(resolve=>{
  button.onclick = ()=>{
    resolve(canvas.toDataURL('image/png'))
  }
})
</script>
"""
def draw(imgm, filename='drawing.png', w=400, h=200, line_width=1):
  display(HTML(canvas_html % (w, h, w,h, filename.split('.')[-1], imgm, line_width)))
  data = eval_js("data")
  binary = b64decode(data.split(',')[1])
  with open(filename, 'wb') as f:
    f.write(binary)
5) 이미지 업로드하고 masked-이미지 생성하기
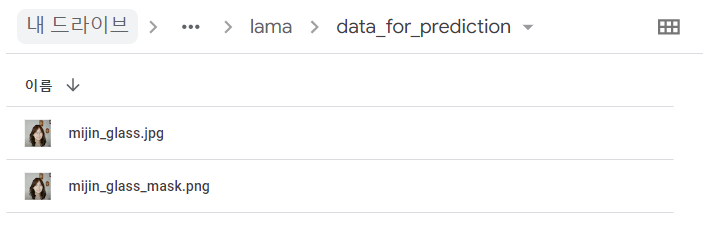
data_for_prediction 이름의 폴더를 생성하고 이 폴더에 생성된 masked 이미지를 저장한다.
from google.colab import files
files = files.upload()
fname = list(files.keys())[0]

! mkdir data_for_prediction

copyfile(fname, f'./data_for_prediction/{fname}')
fname = f'./data_for_prediction/{fname}'
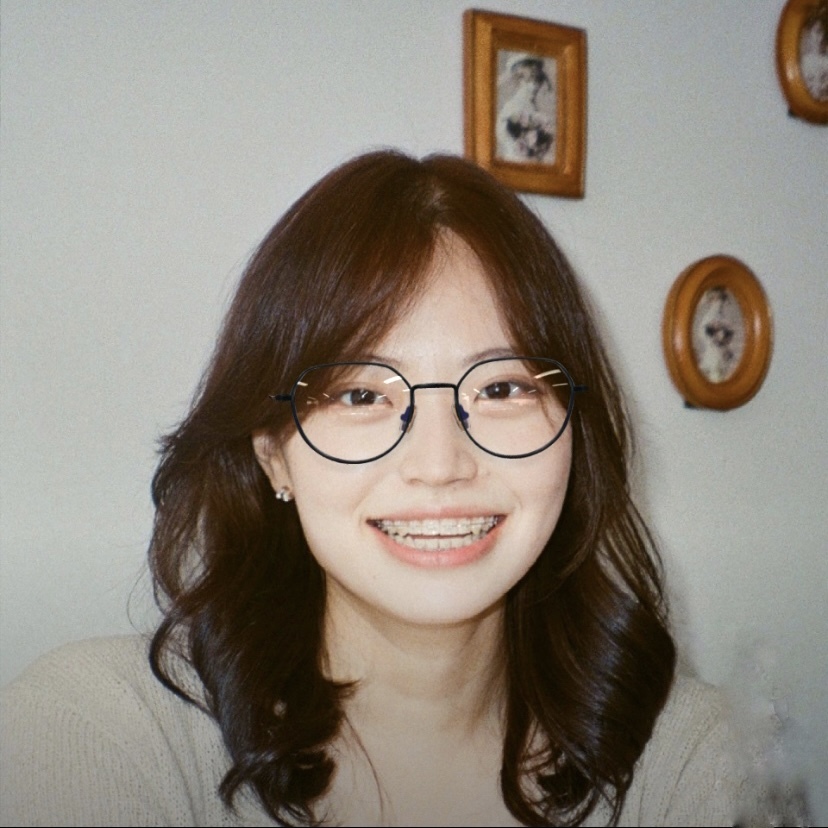
img에 내가 업로드한 파일의 이미지를 저장한다. 나는 다음 이미지를 입력으로 넣어줬다. 이 사진에서 안경을 지워주는 걸 테스트했다.
image64 = base64.b64encode(open(fname, 'rb').read())
image64 = image64.decode('utf-8')

img = np.array(plt.imread(f'{fname}')[:,:,:3])
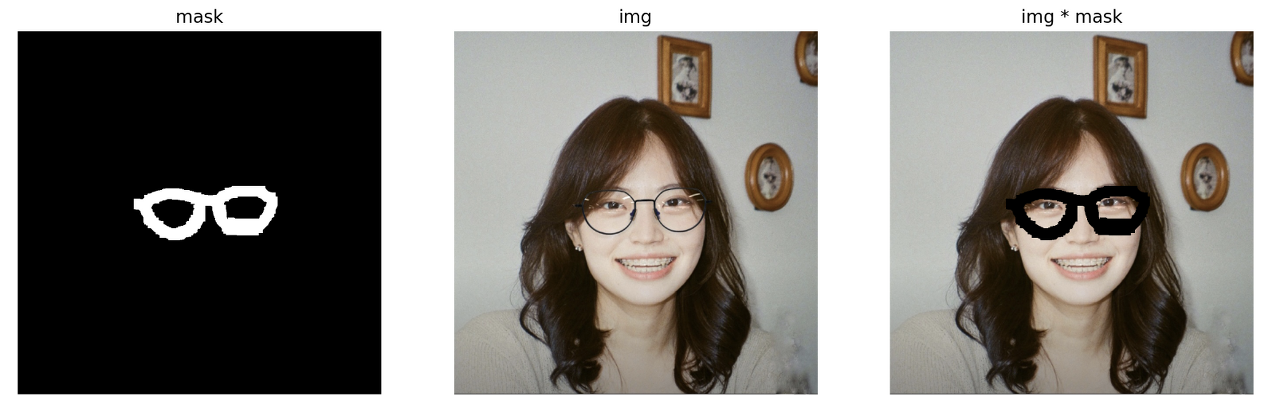
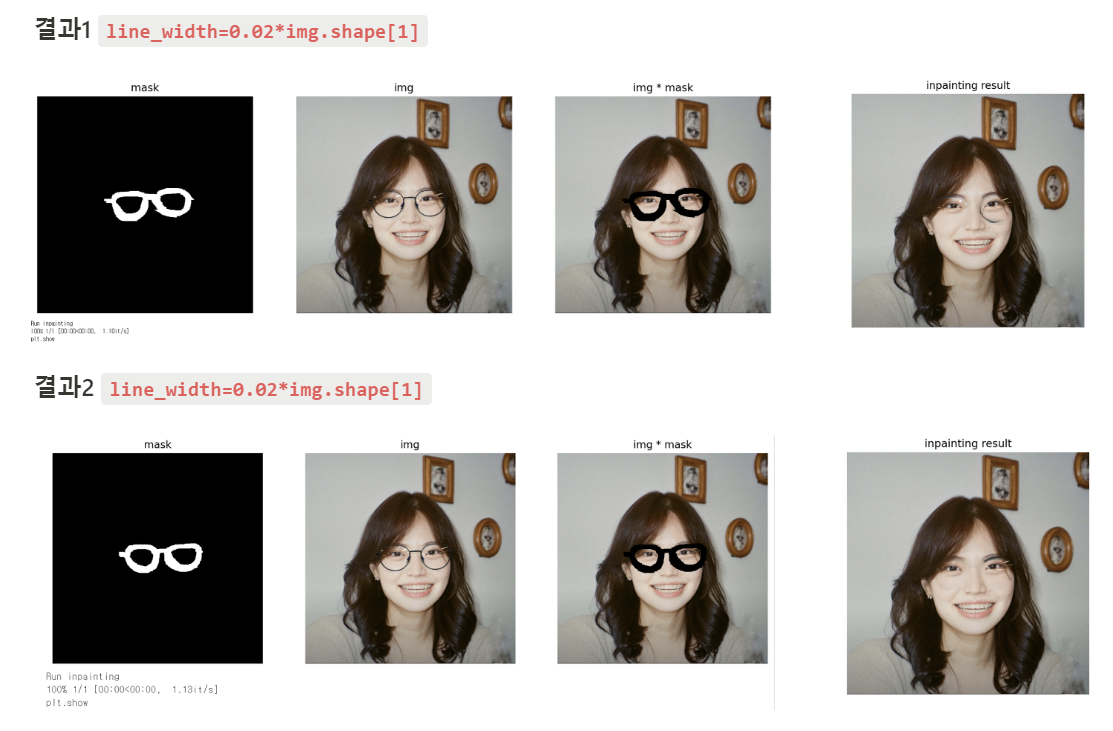
브러쉬로 업로드한 이미지 위에 mask를 생성한다. 여기서 line_width 로 브러쉬 두께를 조절한다.
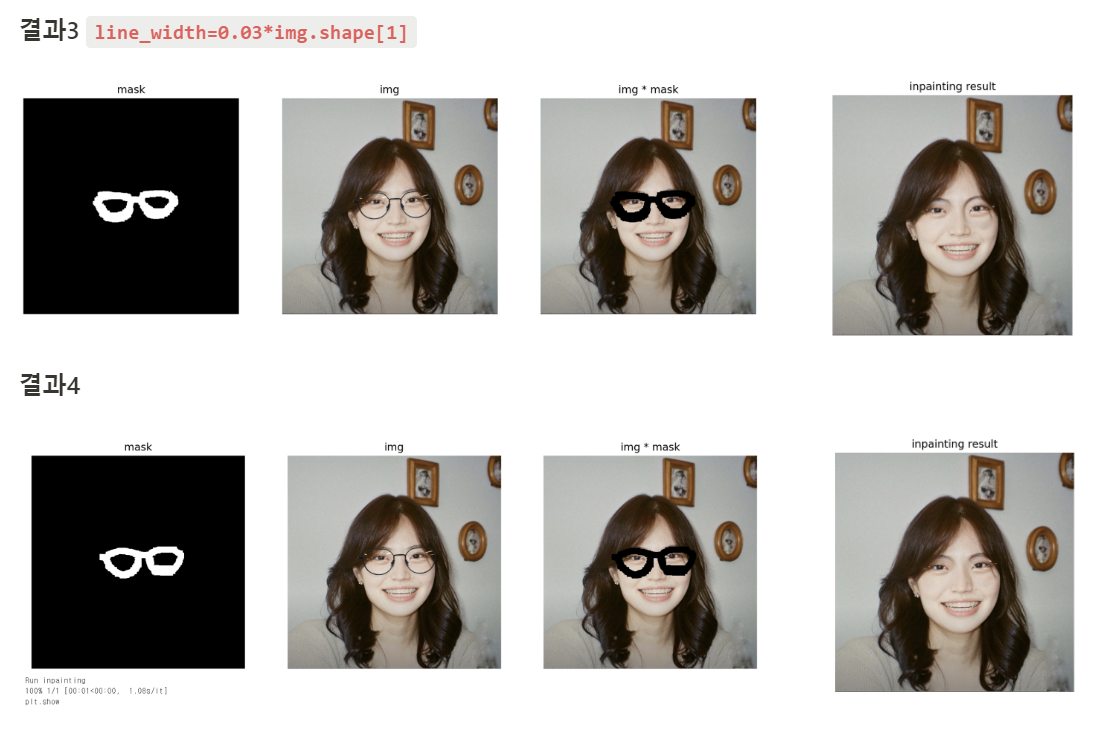
draw(image64, filename=f"./{fname.split('.')[1]}_mask.png", w=img.shape[1], h=img.shape[0], line_width=0.03*img.shape[1])
그 다음 matplotlib을 임포트 해서 마스크 이미지를 그린다.
import matplotlib.pyplot as plt
plt.rcParams["figure.figsize"] = (15,5) # figure의 너비, 높이
plt.rcParams['figure.dpi'] = 200        # figure의 해상도 설정
plt.subplot(131)
# 현재 조작 중인 figure에 subplot을 만들어줌 subplot(행수, 열수, 위치)
with_mask = np.array(plt.imread(f"./{fname.split('.')[1]}_mask.png")[:,:,:3])
mask = (with_mask[:,:,0]==1)*(with_mask[:,:,1]==0)*(with_mask[:,:,2]==0)
plt.imshow(mask, cmap='gray')
plt.axis('off')
plt.title('mask')
plt.imsave(f"./{fname.split('.')[1]}_mask.png",mask, cmap='gray')

plt.subplot(132)
img = np.array(plt.imread(f'{fname}')[:,:,:3])
plt.imshow(img)
plt.axis('off')
plt.title('img')

plt.subplot(133)
img = np.array((1-mask.reshape(mask.shape[0], mask.shape[1], -1))*plt.imread(fname)[:,:,:3])
_=plt.imshow(img)
_=plt.axis('off')
_=plt.title('img * mask')
plt.show()
여기까지 다 했다면 다음과 같이 mask 이미지와 masked img를 모두 얻을 수 있다.
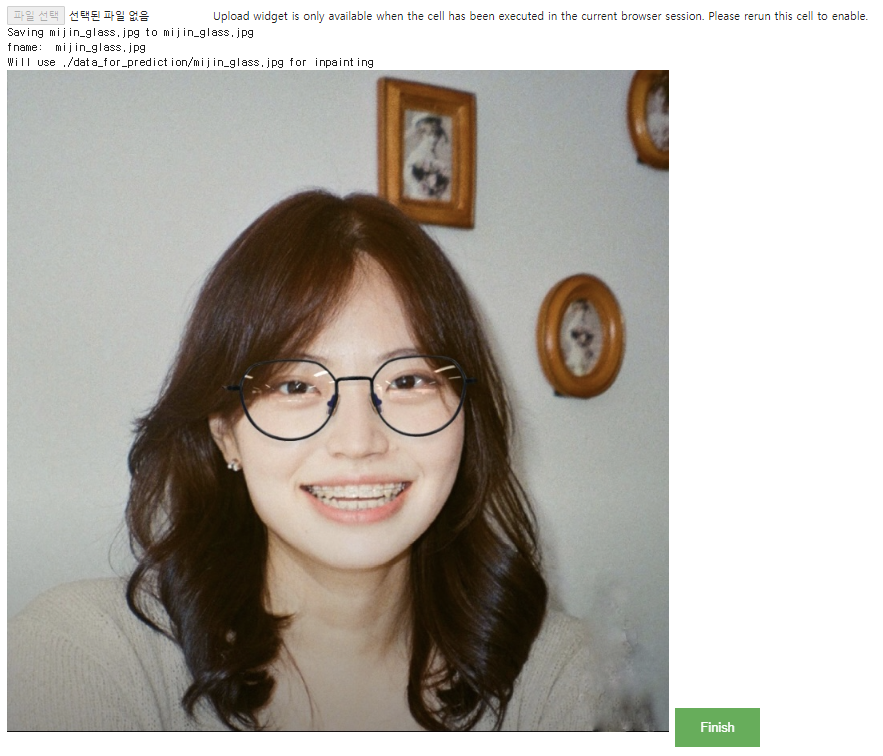
6) Inpainting model 실행시키기
predict.py 파일을 실행시켜서 출력 결과물을 확인해볼 수 있다. 결과 이미지는 마찬가지로 data_for_prediction 폴더에 저장되고, 셀 출력에서도 확인할 수 있다.
print('Run inpainting')
if '.jpeg' in fname:
  !PYTHONPATH=. TORCH_HOME=$(pwd) python3 bin/predict.py model.path=$(pwd)/big_lama indir=$(pwd)/data_for_prediction outdir=$(pwd)/data_for_prediction dataset.img_suffix=.jpeg > /dev/null
elif '.jpg' in fname:
  !PYTHONPATH=. TORCH_HOME=$(pwd) python3 bin/predict.py model.path=$(pwd)/big_lama indir=$(pwd)/data_for_prediction outdir=$(pwd)/data_for_prediction  dataset.img_suffix=.jpg > /dev/null
elif '.png' in fname:
  !PYTHONPATH=. TORCH_HOME=$(pwd) python3 bin/predict.py model.path=$(pwd)/big_lama indir=$(pwd)/data_for_prediction outdir=$(pwd)/data_for_prediction  dataset.img_suffix=.png > /dev/null
else:
  print(f'Error: unknown suffix .{fname.split(".")[-1]} use [.png, .jpeg, .jpg]')

plt.rcParams['figure.dpi'] = 200

print("plt.show")

plt.imshow(plt.imread(f"./data_for_prediction/{fname.split('.')[1].split('/')[2]}_mask.png"))
_=plt.axis('off')
_=plt.title('inpainting result')
plt.show()
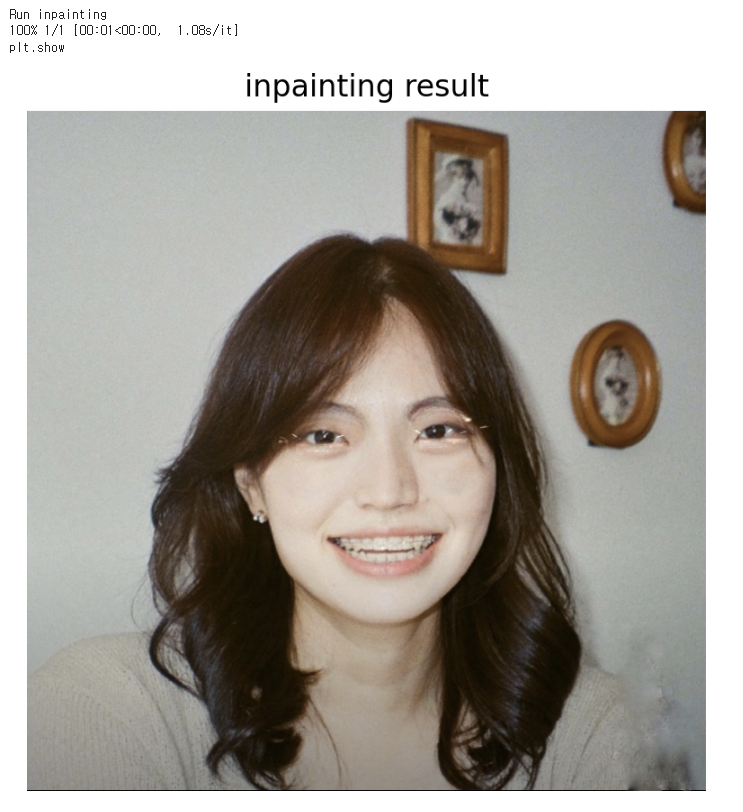
💡결론
이번 실습의 결과는 다음과 같다.
이번 실습을 통해 이 기술을 어떻게 우리 프로젝트에 적용시킬지에 대해 다음과 같이 결론을 도출할 수 있었고, 앞으로 해결해 나가야 할 과제도 찾을 수 있었다.
- 눈썹이랑 안경테 윗부분이랑 겹치는 부분 처리하는 게 좀 미흡한 것 같다. Inapainting Gan 모델을 한번 알아볼까 생각중이다. 아예 안경 쓴 사진을 입력으로 넣었을 때 안경을 벗은 얼굴 사진을 생성해내는 GAN 모델을 만드는 방법을 추가적으로 고려해보게 되었다.
- 브러쉬 두께와 상관관계: 브러쉬를 두껍게 해서 좀 더 넓은 영역을 누락시키면 확실하게 안경테가 지워진 채로 복원이 되는데, 브러쉬를 얇게 할 경우 결과1과 결과2의 오른쪽 안경알처럼 좀 미흡하게 처리된다. Segmentation으로 안경 부분의 픽셀만 자동으로 인식할 때 일부러 좀 더 오버되게 처리하는 게 더 깔끔하게 복원될 수도 있을 것 같다.
- 이 모델은 덩어리가 큰 사물을 제거하고 복원시킬 때 효과적인데, 우리는 안경테만 제거하면 되는 거라 모델을 우리 프로젝트에 맞게 커스터마이징이 필요할 것 같다. (이건 어떻게 해야할지 잘 모르겠지만…)
다음에는 Video Inpainting과 Video Segmentation 실습을 진행할 예정이다!
'Deep Learning' 카테고리의 다른 글
| [PyTorch] DALL-E 파이토치로 구현하기 (0) | 2022.07.28 |
|---|---|
| [Full Stack Deep Learning] Lecture 5 - ML Projects (0) | 2022.05.31 |
| [Full Stack Deep Learning] Lecture 3 - RNNs (0) | 2022.05.10 |
| 인공지능 모델 구현? 설계? 배포? (0) | 2021.11.15 |
| 논문 읽는 법 (0) | 2021.07.26 |